How to drive a NEMA17 stepper motor with a TMC2208 v3 and an Arduino UNO
28th May 2023
Stepper motors are widely used in various applications, from 3D printers to CNC machines. In this tutorial, we will learn how to drive a NEMA17HS3401 stepper motor using a TMC2208 v3 driver connected to an Arduino Uno. By the end of this guide, you will have the knowledge to have basic control of a stepper motor. But first let take a look at NEMA17 stepper motors and the TMC2208 v3 driver
If you would like to skip straight to the tutorial part then please click here
NEMA17 Stepper motors
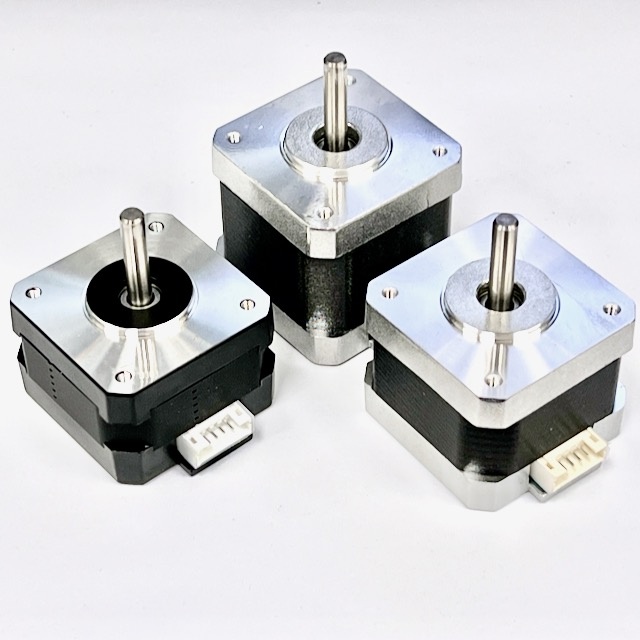
NEMA17 stepper motors are a popular type of stepper motor known for their compact size and versatility. The term “NEMA17” refers to the motor’s standard size and mounting pattern, as defined by the National Electrical Manufacturers Association (NEMA). These motors are widely used in various applications, including robotics, 3D printers, CNC machines, and automation systems.
Key features of NEMA17 stepper motors include:
1. Size and Form Factor: NEMA17 motors have a standardized flange size of 1.7 x 1.7 inches (43.2 x 43.2 mm), making them relatively small and easy to integrate into different projects. The motors typically have a length ranging from 1.3 to 2.4 inches (33 to 61 mm), depending on the specific model and manufacturer.
2. Step Accuracy and Resolution: NEMA17 motors are known for their high step accuracy and resolution, allowing precise control over motor movements. They commonly have step angles of 1.8 degrees per step, resulting in 200 steps per revolution (full-step mode). However, microstepping techniques can further increase the resolution by dividing each step into smaller microsteps.
3. Bipolar Configuration: NEMA17 motors are typically configured as bipolar stepper motors, meaning they have two coil windings. This bipolar configuration offers better torque and control compared to unipolar stepper motors. To drive a bipolar stepper motor, an H-bridge or specialized motor driver is required.
4. Holding Torque: NEMA17 motors come in various torque ratings, typically ranging from a few Ncm (Newton centimeters) up to several dozen Ncm. Holding torque refers to the amount of torque the motor can exert to hold its position when not in motion. Higher torque ratings enable the motor to handle larger loads or overcome resistance more effectively.
5. Wiring Configuration: NEMA17 stepper motors usually have four or six leads, with each lead corresponding to a coil winding. The wiring configuration varies depending on the motor model and manufacturer. It’s essential to refer to the motor’s datasheet or markings to correctly identify the wiring configuration (e.g., bipolar series, bipolar parallel, or unipolar) for proper connection to the motor driver.
Conclusion: NEMA17 stepper motors are a widely used and versatile option for precise motion control in various applications. With their compact size, high step accuracy, and torque capabilities, they offer excellent performance and reliability. Whether you’re building a 3D printer, robotic arm, or any project requiring precise positioning and control, the NEMA17 stepper motor is a popular choice that delivers exceptional performance.
TMC2208 v3
The TMC2208 v3 stepper motor driver is a popular choice for controlling stepper motors in various applications, offering advanced features and excellent performance. Developed by Trinamic, a leading motion control solutions provider, the TMC2208 v3 driver is part of their TMC2208 family of stepper motor drivers.
Key features of the TMC2208 v3 stepper motor driver include:
1. SilentStepStick Technology: The TMC2208 v3 driver implements Trinamic’s advanced SilentStepStick technology, which utilizes a stealthChop2 chopper algorithm to ensure silent and smooth motor operation. This technology enables precise and quiet motion, making it ideal for noise-sensitive applications such as 3D printers and home automation systems.
2. StealthChop and SpreadCycle Modes: The TMC2208 v3 driver supports both the stealthChop and SpreadCycle modes of operation. The stealthChop mode provides silent and low-vibration motion at low speeds, while the SpreadCycle mode offers high torque and dynamic motion at higher speeds.
3. Microstepping Support: The driver supports microstepping, allowing for finer resolution and smoother movement compared to full-step operation. It can provide up to 256 microsteps per full step, depending on the configuration.
4. Sensorless Stall Detection: The TMC2208 v3 driver incorporates sensorless stall detection technology, which can detect when a motor stalls or encounters excessive resistance. This feature can be useful for detecting issues and preventing motor damage in real-time, enhancing system reliability.
5. UART Interface: The TMC2208 v3 driver features a UART (Universal Asynchronous Receiver-Transmitter) interface, allowing for convenient communication and configuration of the driver via a serial connection. The UART interface provides easy access to various driver settings, such as current limits, motor direction, and microstepping options.
6. Thermal Protection: The driver includes built-in thermal protection mechanisms that monitor the temperature of the driver chip. If the temperature exceeds a specified threshold, the driver can dynamically adjust the motor current to prevent overheating and ensure safe operation.
7. Compact Size and Easy Integration: The TMC2208 v3 driver is designed in a compact form factor, making it easy to integrate into various projects. It typically comes in a stepper motor driver module or breakout board format, providing convenient connection points for power, motor, and control signals.
Tutorial
Requirements: Before we begin, make sure you have the following components ready:
- Arduino Uno board
- TMC2208 v3 stepper motor driver
- NEMA17HS3401 stepper motor
- Jumper wires
- 47uF Electrolytic Capacitor
- Breadboard (optional, for easy prototyping)
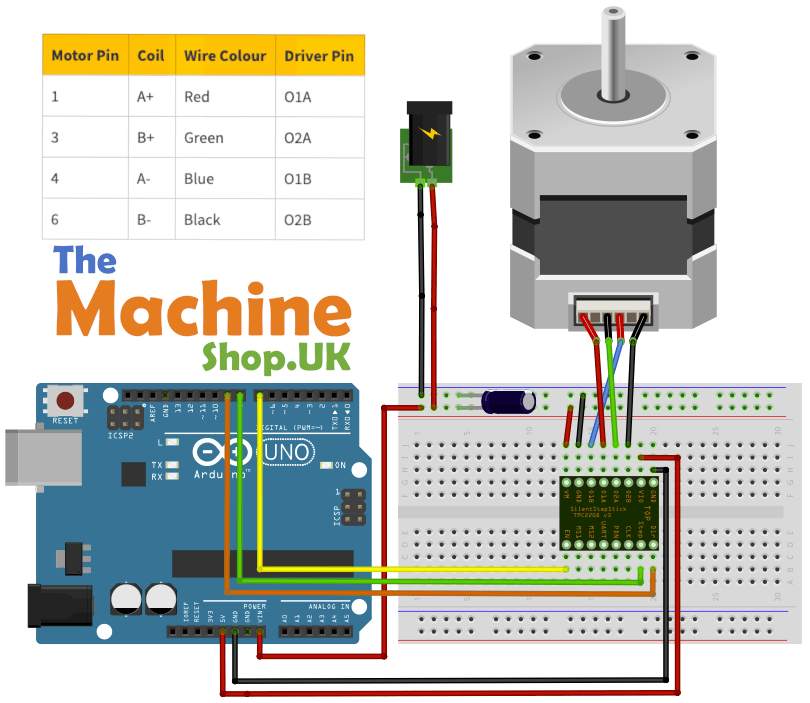
Step 1: Wiring: Start by connecting the components as follows (see the diagram below):
- Connect the VIO and GND pins of the TMC2208 driver to the 5V and GND pins on the Arduino Uno, respectively.
- Connect the EN (enable), STEP and DIR (direction) pins of the TMC2208 driver to any digital pins on the Arduino Uno. For this tutorial, let’s use digital pin 7 for EN, pin 8 for STEP and pin 9 for DIR.
- Connect the VMOT pin of the TMC2208 driver to a separate power supply capable of providing sufficient voltage for your stepper motor, we recommend 12v for the NEMA17. Make sure to connect the power supply’s ground (GND) to the Arduino UNO’s GND as well. If you want to power the Arduino UNO from the same power supply, then connect it to the UNO’s VIN pin.
- Connect the electrolytic capacitor across the power supply rails, ensuring that the negative pin on the capacitor is connected to GND.
- Connect the stepper motor’s coil wires (A-, A+, B+, B-) to the corresponding pins on the TMC2208 driver. Check out the diagram below for the NEMA17HS3401. Refer to the motor’s datasheet or labels on the motor itself to determine which wire corresponds to each coil.
Step 3: Create Some Code: Now, let’s upload some code to the Arduino Uno. This code will enable you to control the stepper motor by calling a function and setting the number of steps, the direction and the speed you want the motor to rotate.
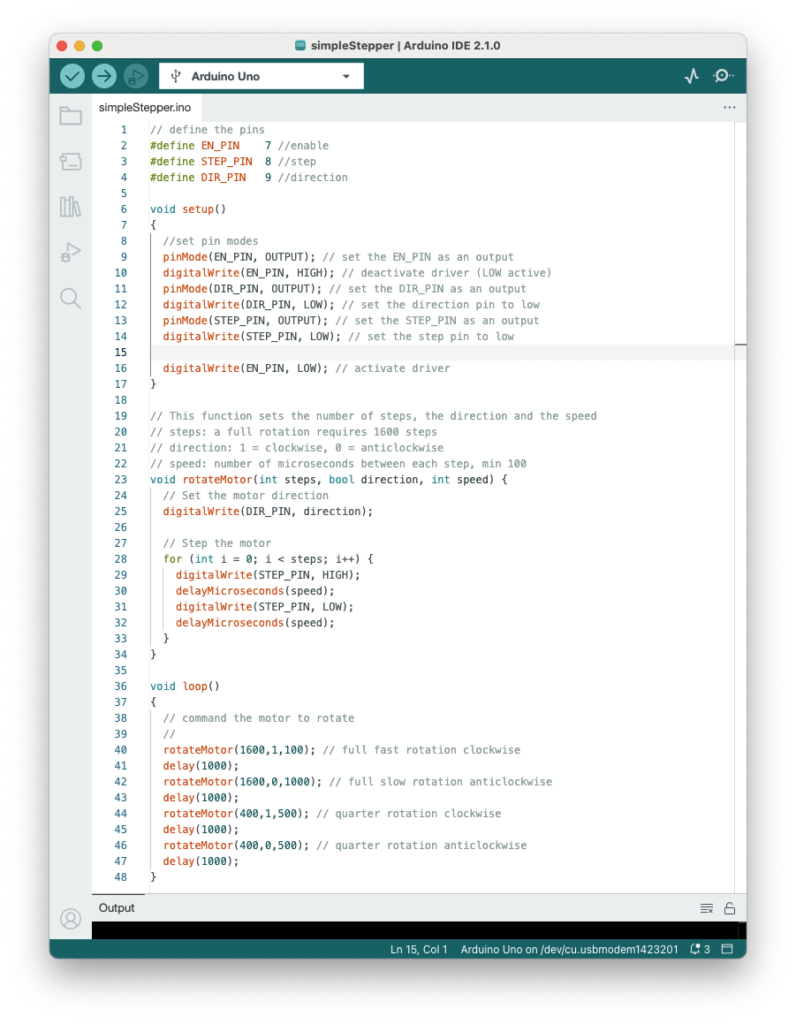
// define the pins
#define EN_PIN    7 //enable
#define STEP_PIN  8 //step
#define DIR_PIN   9 //direction

void setup()
{
  //set pin modes
  pinMode(EN_PIN, OUTPUT); // set the EN_PIN as an output
  digitalWrite(EN_PIN, HIGH); // deactivate driver (LOW active)
  pinMode(DIR_PIN, OUTPUT); // set the DIR_PIN as an output
  digitalWrite(DIR_PIN, LOW); // set the direction pin to low
  pinMode(STEP_PIN, OUTPUT); // set the STEP_PIN as an output
  digitalWrite(STEP_PIN, LOW); // set the step pin to low

  digitalWrite(EN_PIN, LOW); // activate driver
}

// This function sets the number of steps, the direction and the speed
// steps: a full rotation requires 1600 steps
// direction: 1 = clockwise, 0 = anticlockwise
// speed: number of microseconds between each step, min 100
void rotateMotor(int steps, bool direction, int speed) {
  // Set the motor direction
  digitalWrite(DIR_PIN, direction);

  // Step the motor
  for (int i = 0; i < steps; i++) {
    digitalWrite(STEP_PIN, HIGH);
    delayMicroseconds(speed);
    digitalWrite(STEP_PIN, LOW);
    delayMicroseconds(speed);
  }
}

void loop()
{
  //make steps
  rotateMotor(1600,1,100); // full fast rotation clockwise
  delay(1000); // one second delay
  rotateMotor(1600,0,1000); // full slow rotation anticlockwise
  delay(1000); // one second delay
  rotateMotor(400,1,500); // quarter rotation clockwise
  delay(1000); // one second delay
  rotateMotor(400,0,500); // quarter rotation anticlockwise
  delay(1000); // one second delay
}
Step 5: Uploading and Testing
- Connect your Arduino Uno to your computer using a USB cable.
- Select the correct board and port from the Tools menu in the Arduino IDE.
- Click on the “Upload” button to upload the code to the Arduino.
- Once the upload is complete, ensure your motor power is on and you should see your stepper motor rotating.
You may need to adjust the current limit going to your motor if you are finding that it is missing steps, this can be done by rotating the small potentiometer on the TMC2208.
Well done, you now know how to control a stepper motor with an Arduino using the TMC2208 v3 stepper driver.


Brilliant guide, works perfect!